Spark Cinematics of Natural Selection 2
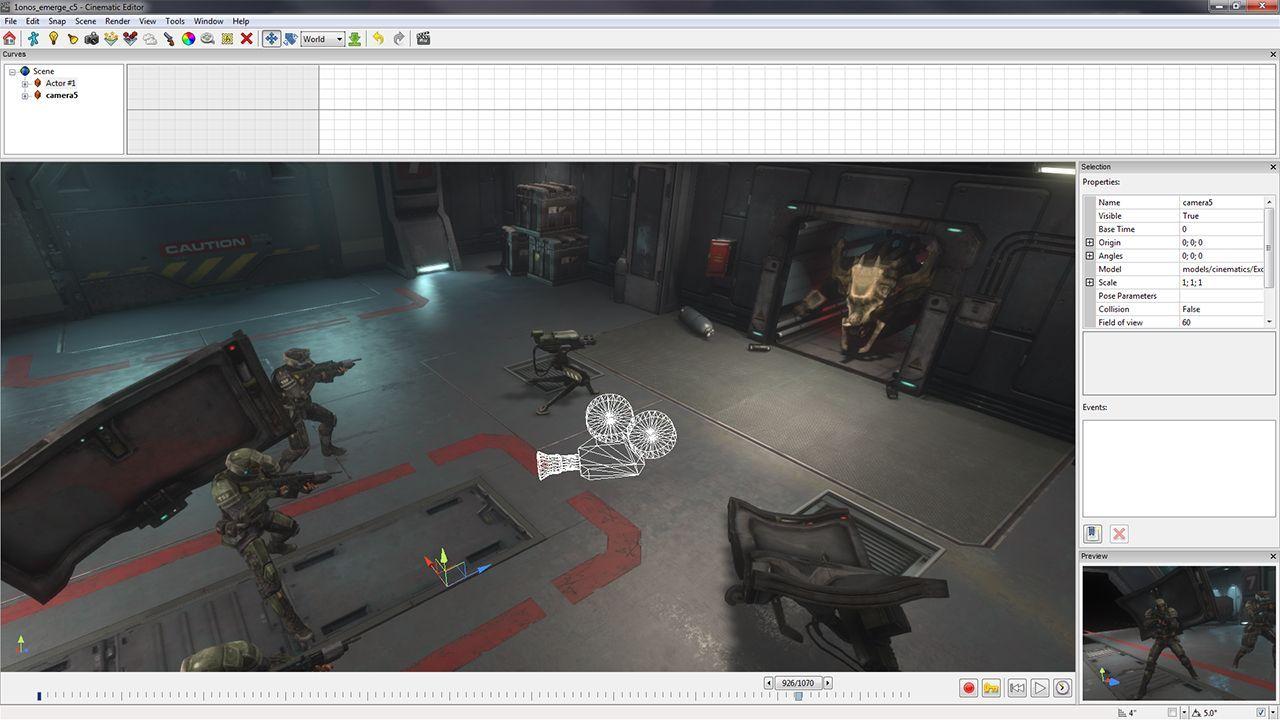
Hello, this is Brian Cummings aka Chops from Unknown Worlds. This blog post is to talk about my experiences with the Spark Cinematic Editor.
I started with the company in 2009 near the beginning of production for NS2. I was hired as an intern to help with scheduling and tracking the Art tasks for production. After a short while I started to see some other useful things I could do for the team. One of the tasks that came up was to create a more interesting cinematic for the next alien to be revealed... the Lerk. I volunteered to create the cinematic using our Spark Cinematic Editor and got started.
-------------------------------------------------------------------------
The Lerk Reveal
httpv://www.youtube.com/watch?v=0qTePDz4oTg
At this time the Spark Cinematic Editor was still very new. It was first created with everything needed to make the original NS2 Teaser video with the Onos in the hallway. I did not make that cinematic so this was my first real experience with the tool. I jumped right into it and surprisingly was able to get a very rough version of the cinematic ready in a day or two.
httpv://www.youtube.com/watch?v=eOMv51NdA3o
Quickly I realized that it was not ideal to create this all in one scene and soon broke it up into 4 parts. That is my first pro-tip for those interested using the tool... Pretty much every camera cut should be a new scene. Why is this such a problem in the SCE? Well mostly it's because you can not adjust tags using the time slider. Instead you need to manually adjust each key in the Graph Editor of the tool but moving multiple keys often causes the tool to crash. So by separating the files you won't have to worry about moving everything in scene 4 if you just adjusted the timing in the scene 2.
Second pro-tip is to SAVE OFTEN as even today the tool is crash happy. The auto-save feature was not available for at least a year after starting this project so I learned this the hard way. heh.
Other than that it was pretty painless. Once Cory got involved and people started to say "wouldn't it be cool if..." things got shifted around and the polish phase was extended a few weeks but it was worth it. I'd like to add that you should make sure you give your sound guy some time, as sounds and music can make or break a cinematic. (pro-tip #3?) I believe Simon did all of the audio and re-purposed some of the music from our soundtrack.
Note that this whole video was created fully in SCE as advertised, and was using all stock animations. The only movie magic that was added was in the final scene where the first person view was a composite of two renders to show different levels of motion blur between the view model and the background.
Everyone enjoyed the results so we began to plan more short cinematics.
-------------------------------------------------------
____, Teaser:
httpv://www.youtube.com/watch?v=7bpcA0S0pBc
The gorge belly slide came from a suggestion on the forums. We thought it was an awesome idea and added the feature to NS2. To announce this feature we thought it would be cool to make a cinematic and so it began.
Initially it was going to just be a short 30 second video showing a little build up and then the gorge would slide down and bump into the barrels. We were having a lot of issues with the rendering process which pushed for further development of the cinematic tool and the engine. You can still see z-fighting issues in the background and some animation popping, but that is what we had to work with at the time. Also with limited options in the curve editor, it was difficult to make any complex camera or character movements.
The most complex move was the transition of the gorge from the angled stairs to the flat ground. To fix this I ended up making two gorges, one going down the stairs and one going across the floor, and then swapped visibility on the two. I coupled this with a strategically timed cut to cover up the problem.
Of course I ended up making this whole video in one scene despite my previous lesson on the topic... By the time sound was added we were getting much farther with the Fade so we decided to add the mysterious shadow tease clip at the end. Again this was done all in the SCE and all with stock animations.
-------------------------------------------------------------------------
Fade Reveal:
httpv://www.youtube.com/watch?v=U98Tbr5P2bs
As our final alien lifeform to reveal and after seeing what can be done with the SCE, we were already talking about what kind of cool things we could do for the Fade. Cory really wanted to kick it up a notch and I was feeling confident that I could do pretty much anything he wanted, but there were going to need to be some changes to the process first.
So, with a longer video packed with action, we were going to need to do some more in depth planning. Cory drafted up a story board which I put together into this animatic:
httpv://www.youtube.com/watch?v=DEMC_na0LvE
After that was done I created this test cinematic based on the animatic. I have to share this because it cracks me up:
httpv://www.youtube.com/watch?v=DpVzm3kREkY
As you can see, changes where made between what we started with and what we ended with, but the majority of the shots remained intact. For shot #2 in particular I thought that showing the fade at the beginning was too early of a giveaway and takes away from his more dramatic appearance later in the video. On the other hand, Cory's original idea was fleshed out a bit and looked like this:
httpv://www.youtube.com/watch?v=5d1Hj1gIfHo
Eventually we settled on cutting out the first appearance and adding a lot more action to the fight scene.
You might have noticed that at least half of the animations in this video are completely custom. This is true. We worked closely with an animator throughout the production of this video. Using an exported .obj from the level editor as reference, he created entire scenes in 3DS Max and I exported everything for the cinematic. It was a great effort to make sure every character was set up correctly with the right animations loaded but it really improved the animation quality of the reveal. Cory even made custom marine skins with the rookie that gets killed first and the vet who gets knocked into the glass.
In the end we had 29 separate scene files to work with. This did make it much easier to develop in some cases, but added a lot more setup time on my end. Again, camera limitations made this quite difficult but I was beginning to develop a new technique of animating the camera in Max and importing it as a view model. For the Fade Reveal I only used this technique as a zooming pose parameter for the slow-mo spin around shot, but in future videos it is used much more.
Another feature that was added during the development of this video was the ability to load a cinematic within a scene. With this I could add effects like bullet impacts, tracers, and the Fade blink just by loading one file instead of copying the entire effect in manually. This was exceptionally useful since we were still tweaking the blink effect for the Fade and I was able to see the tweaked effects in my scene without needing to make any changes.
-------------------------------------------------------------------------
Onos Vs Exo Launch Trailer:
httpv://www.youtube.com/watch?v=re9sqgeWFDM
With launch looming and the Exosuit being developed, we wanted to make one more big cinematic. Cory busted out the story board rather quickly and I put a 2d animatic and 3d animatic together:
httpv://www.youtube.com/watch?v=wWC-piCFyAY
httpv://www.youtube.com/watch?v=QZe2rS0qkqE
httpv://www.youtube.com/watch?v=NVWV3HAJpeQ
For this cinematic we decided to do everything in 3DS Max and then import it in. In most cases I exported a group of characters together as one big animation file. For example, all of the skulks in the last shot were exported together as one model and animation set. Most of the cameras where exported directly from 3DS Max so that they could be animated there instead of using the limited controls of the SCE. Having the cameras in Max also helped the animator see exactly what was going to be in the shot so he didn't waste time on unseen animations.
httpv://www.youtube.com/watch?v=zG6y69w9kdo&
One new thing that I pushed to have added was the ability to attach a cinematic to a model. Attach points are used in the game already to indicate where a muzzle flash is, so why not use them in the cinematic editor? Trying to animate the position of an effect manually is a real challenge for shots like the Exosuit shooting everywhere. Now all you have to do is add the cinematic event to the model, assign the attach point, adjust the base time, and then the effect will follow the motion of the animated object. I should mention that our VFX guy, Sylvain, was a large part of why this video looked awesome. He spent a good bit of effort creating custom effects for each scene which was something we had not done before.
-------------------------------------------------------------------------
Since then, Cory has picked up using the SCE for his own shorts (like the cinematics in the Gorgeous update) but we've mostly switched our focus to using more Gameplay footage in promotional videos. In summary I feel like the tool has a lot of potential for creating fun videos and I plan to put together better tutorials for those that are interested in doing so. I'm not sure what anyone will get out of this post if anything, but at least I think it was a good excuse to dig through old files and show off some cool things I found.
-Brian


