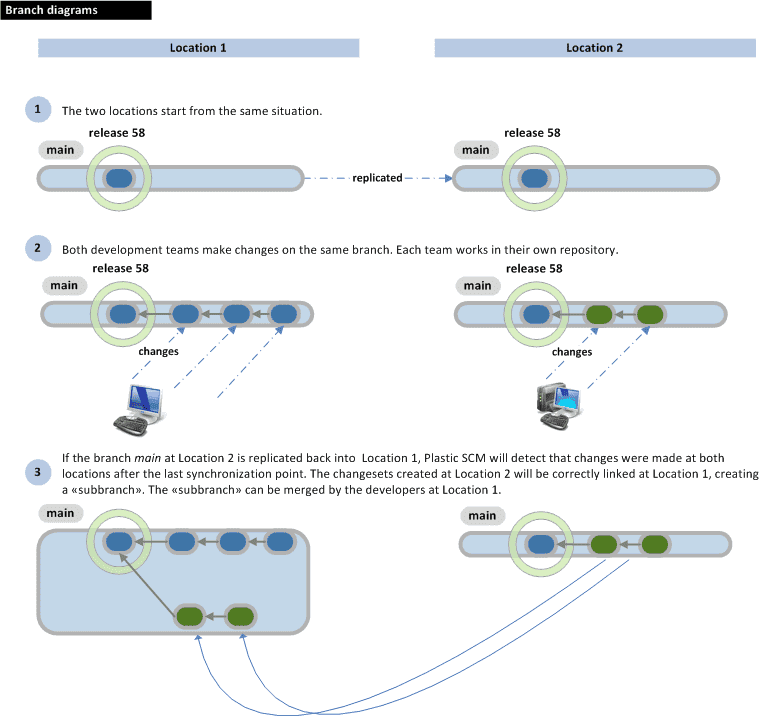
Lukas discusses the use of Plastic SCM in a global teamIf you are working in a team, I don't have to tell you how important version control systems (like Git, SVN or Mercurial) are. They are essential tools of everyday work for every team. At Unknown Worlds we used SVN for a very long time. We were quite satisfied with it, but with time we stumbled upon two major flaws: the repository was working slower with each gigabyte stored, SVN (and Git too!) have performance troubles with binary assets - and in game dev, we've got tons of them. After intense search for a better solution, we found Plastic. It was designed with large-scale repositories in mind and it handles binary assets very well. This in addition, Plastic's ease of use, good GUI, and speed was enough to make us quite sure we had found the right piece of software. We had one more problem - the internet uplink in our main office has only 20Mbit/s upload speed, so it was pretty easy to fully saturate it. Given that most of our team is working from outside of the office, spread all over the world, it became a major issue for us. Just imagine syncing your local working copy at the speed of 50Kb/s! We took advantage of another awesome feature of Plastic - it supports distributed scenarios very well. Thanks to this, I set up 2 additional servers for our team. Here's how I did it. Our main repository is located in our San Francisco office. In addition to that, we needed two more servers - one in Europe and one in Asia/Pacific region. I used Amazon EC2 as our VPS provider. One more thing: I must emphasize that my sysadmin knowledge is very limited. Plastic supports four usage scenarios - from a single-server setup up to full distribution with unlimited servers. Our needs were satisfied with the third scenario called "Full multisite support". You can find all of them here.
The first thing we need is a configured VPS server. As I mentioned I'm using Amazon EC2 VPS server that will handle only Plastic, but feel free to use any provider and setup you're happy with. When adding a new EC2 instance, make sure you're in the right region. I used Ireland for the first server.
I think that Ubuntu Server is perfect for this task, so I used Ubuntu Server 14.04 on a m3.large instance with 128GB of storage for the repository.
Remember to enable Plastic traffic on the firewall!
Here's the summary I saw just before starting the server:
After the server is live, you'll have to create a new SSH key pair (or use existing one if you have it). This step is very important, so read everything you see on the screen.
If you need any more help with connecting to your server, take a look at
this article at Amazon's official documentation for EC2. OK, we should have a working Linux server now, so let's connect!
The first thing we need for Plastic is storage. EC2 instances come with very limited space, so we'll need to prepare the EBS partitions. Basically use
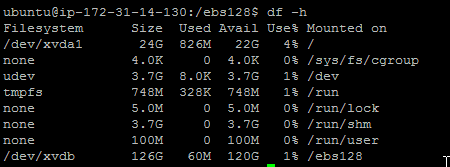
this tutorial from EC2 User's Guide. Here's how I did it: [bash]sudo mkfs -t ext4 /dev/xvdb sudo mkdir /ebs128 sudo mount /dev/xvdb ebs128/ sudo cp /etc/fstab /etc/fstab.orig[/bash] Now be super-cautious! [bash]sudo nano /etc/fstab[/bash] The file should contain two lines: [bash]LABEL=cloudimg-rootfs / ext4 defaults,discard 0 0 /dev/xvdb /ebs128 ext4 defaults,nofail,nobootwait 0 2[/bash] Now test it: [bash]sudo mount -a[/bash] In case of failure, return to the backup copy: [bash]sudo mv /etc/fstab.orig /etc/fstab[/bash] To see the partitions, use "df -h" command.
In the next step we'll use the new partition to store the data using a relational database. Let's install and tune a MySQL server. First, get the fresh packages by updating your system. [bash]sudo apt-get update sudo apt-get upgrade[/bash] Tip: if it asks you about grub and you don't know what to do - choose option #1 and select "yes" in the next step to omit the changes. Then, install MySQL server: [bash]sudo apt-get install mysql-server[/bash] Now we'll make sure that MySQL uses EBS for storage. This will decouple the Linux server from the data. It might be usefull when upgrading. [bash]sudo mkdir /ebs128/etc /ebs128/lib /ebs128/log sudo service mysql stop sudo mv /etc/mysql /ebs128/etc sudo mv /var/lib/mysql /ebs128/lib sudo mv /var/log/mysql /ebs128/log sudo mkdir /etc/mysql /var/lib/mysql /var/log/mysql echo "/ebs128/etc/mysql /etc/mysql none bind" | sudo tee -a /etc/fstab sudo mount /etc/mysql echo "/ebs128/lib/mysql /var/lib/mysql none bind" | sudo tee -a /etc/fstab sudo mount /var/lib/mysql echo "/ebs128/log/mysql /var/log/mysql none bind" | sudo tee -a /etc/fstab sudo mount /var/log/mysql sudo service mysql start[/bash] That's it, after those steps the Plastic data and server will be on a separate servers. Now let's tune the MySQL for better performance. I used
this section of Plastic docs. [bash]sudo mysql -uroot -pYOUR_PASSWORD_HERE -e"SET GLOBAL innodb_fast_shutdown = 0" sudo service mysql restart sudo service mysql stop sudo su rm -f /var/lib/mysql/ib_logfile[01] exit sudo nano /ebs128/etc/mysql/my.cnf[/bash] Now you should see a text file opened on your screen. Scroll down until you'll see "InnoDB" section. Modify it so it looks like this: [bash]# * InnoDB # # InnoDB is enabled by default with a 10MB datafile in /var/lib/mysql/. # Read the manual for more InnoDB related options. There are many! innodb_buffer_pool_size = 4G innodb_additional_mem_pool_size = 200M innodb_log_file_size = 1G innodb_log_buffer_size = 80M[/bash] Now we have to restart the server and it's good to go! [bash]sudo service mysql start[/bash] Finally, we're ready to install the Plastic server! You can download it from the
official page. You need to put it under a publicly-available URL. I sent it to dropbox and used wget to download it. [bash]wget https://www.dropbox.com/s/v8gz1nvbduks07b/PlasticSCM-5.0.44.581-linux-x64-installer.run[/bash] Make it runnable and prepare the EBS folders... [bash]chmod +x PlasticSCM-5.0.44.581-linux-x64-installer.run sudo mkdir /ebs128/plasticscm5 sudo chown ubuntu /ebs128/plasticscm5/[/bash] Then run the installer. [bash]sudo ./PlasticSCM-5.0.44.581-linux-x64-installer.run[/bash] Set the install path to /ebs128/plasticscm5/Other than that the installation is pretty straightforward. Do I need to say you don't need any IDE plugins installed? :) After the install choose to start the server and configure the client. I used UPWorkingMode (username/password pairs), because we use it on the main server. I also used default server port. When configuring the server - choose UPWorkingMode (5) again. User/password settings are just temporary, so use something super easy to remember just in case. The server address will be localhost, and the port - 8087. If you make any mistakes configuring client, you can do that again using "clconfigureclient" command. Now, we need to copy our license, users and groups from main server to the new server. You'll need three files: plasticd.lic, groups.conf and users.conf. By default you can find them at /opt/plasticscm5/server. Got them prepared? Good. Replace those files now, you can find them in ebs128/plasticscm5/server. [bash]cd /ebs128/plasticscm5/server/ sudo rm plasticd.lic users.conf groups.conf sudo wget https://www.dropbox.com/s/wdo126efopb7kp3/cfg.zip sudo apt-get install unzip sudo unzip cfg.zip sudo ./plasticsd restart[/bash] After that - your server should be ready to test! Let's do it. Go to Plastic interface -> Preferences -> Profiles and add a new one. Choose "automatic" for "Connection type", fill the server IP/port (found in AWS console), select "user/password based security" and then provide your credentials (same as on your main Plastic server) and click finish. Now the default branch of that server should appear on "Repositorioes & workspaces" screen. We're not over yet! One more thing we need to do in the console is configuring the server to use MySQL as storage engine. [bash]sudo /ebs128/plasticscm5/server/plasticsd stop sudo nano /ebs128/plasticscm5/server/db.conf[/bash] The file should contain the few lines listed below: [xml]<DbConfig> <ProviderName>mysql</ProviderName> <ConnectionString>Server=localhost;User ID=root;Password=KSIR_9masl03-2_20;Database={0};Pooling=true</ConnectionString> <DatabasePath></DatabasePath> </DbConfig>[/xml] Now we're ready to start the server. [bash]sudo /ebs128/plasticscm5/server/plasticsd start[/bash] Okay, now we should be good to go! Create the repository...

And we're done! The hard part is over, you can do the rest via the interface. If you have any questions or comments - please use the comments section below. You can also
ping me on Twitter using @lnowaczek.
- Lukas


